Hawaiʻi's Technology Community
Rails on Windows With Bitnami
When I first started learning Ruby on Rails back in 2007, one thing was made clear: don’t even try setting it up on a Windows machine. Since then, we had some open source projects like RailsInstaller that make it really easy to set up a development environment on your machine. Also, with the advent of virtual machines and Vagrant, it is really easy to get a Linux environment set up regardless of what operating system you’re on.
These things are all great if you are setting up a development box, but what about production? RailsInstaller is used for development and the virtual machine approach doesn’t work if your system administrator is not familiar with Linux at all. However, a lot has changed in the past 8 years and it is possible to get a production setup on Windows. Doing so is not straightforward and the resources are limited, but it is in fact possible.
We’ll set up our production environment using Bitnami’s Ruby stack, which bundles Ruby, Apache, Postgres, and some gems that will get our production setup to work. Most of this is based off of this Stack Overflow answer with some minor changes.
Install Bitnami and Set Up Your Project
First of all, go to the Bitnami Ruby stack page and download and run the local installer. Once that is done, you should have a new directory that contains all of the components that Bitnami installed. You should also have a new command line shortcut in your start menu that is called “Use Bitnami Ruby Stack”. Whenever you are executing commands, make sure to use the terminal window created by that shortcut. It runs as administrator, sets up your path, and takes you directly to the Bitnami directory.
Next, you will need a way to download your project. I chose to use Github for Windows to make it easier to talk to a Github repository. It is a little annoying to go back and forth between the command line and Github for Windows, but it was easier than attempting to install OpenSSL. Once that is installed, clone your project into Bitnami’s projects directory so that it can be easily accessed from the command line.
After that, normal Ruby commands should work within the Bitnami cmd terminal, so you can use your usual commands to set up your project (bundle install, rake db:create, rake db:migrate, etc). I set up a PostgreSQL database on another server, so I won’t get into configuring the database. Once the database is set up, you only need to update the database.yml to point to that database.
Setting up Apache as a Reverse Proxy
Bitnami comes with both Apache and Nginx. Since Bitnami’s service manager already has Apache set up (at the time of this writing), we will use that as our server. Nginx could work with a little bit of effort.
Open the httpd.conf for Bitnami (something like C:\
https://gist.github.com/keokilee/5def7622c3a52df36a3e
After that, edit bitnami.conf (something like C:\
This also sets up far-future expiration headers for assets so your server isn’t hammered with constant requests.
Installing the App as a Windows Service
Create a batch script (*.bat) file to start up your Rails application. Mine looks something like https://gist.github.com/keokilee/7266195a3463302dc71f
I used Thin to start up our server because it is installed by default with Bitnami. I could use Puma or another server, but again I did not want to deal with more installation issues. We will pass in the port number as an argument to the script.
Next, download NSSM (Non-Sucking Service Manager) and put it on your path. Run “nssm install
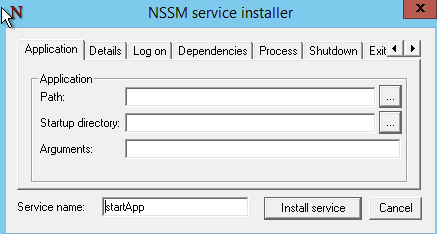 Installing a service named “startApp” in the NSSM GUI.
Set the path to be the path to your batch script. The startup directory should be your Github project directory. Arguments should just include the port number. In the Apache config, we have two servers in our load balancer, so you’ll need to create one service with port 3000 as the argument and another with port 3001.
Once that is done, start the services you created using Windows’ Services menu (Start menu -> Administrative Tools -> Services). Then, open Bitnami’s GUI and restart the Apache server. Once that is done, you should be able to go to localhost and see your app.
Setting Up SSL
Most of the above was culled from that Stack Overflow answer, but we also needed to set up SSL on our application. This requires a few changes to our setup. First, let’s update our Apache config. My new bitnami.conf virtual hosts looks something like https://gist.github.com/keokilee/9980702b6b687fd32403
The main changes are 1) we set up a redirect from port 80 to go to our SSL URL) and 2) we added in a bunch of SSL configuration options. Make sure to input the correct paths to your SSL certificate (SSLCertificateFile), private key (SSLCertificateKeyFile), and a combined certificate plus private key for the proxy members (SSLProxyMachineCertificateFile).
Next, we need to update our thin servers to use SSL. The batch script should now look something like https://gist.github.com/keokilee/b650b1f80d658d84ff14
Restart your services and Apache and the site should now work with SSL.
That’s the gist of how we set up our Rails 4.1.8 app on Windows server. I’m sure there are things we could change like using Puma instead of Thin or Nginx instead of Apache, but this got us a working system with a minimal amount of headache. Still, if you have suggestions or comments, let me know.
This blog post originally appeared on Medium.
Views: 1807
Comment
© 2025 Created by Daniel Leuck.
Powered by
![]()
You need to be a member of TechHui to add comments!
Join TechHui